Showing posts with label BYOB. Show all posts

Wednesday, July 15, 2009

Baguettes

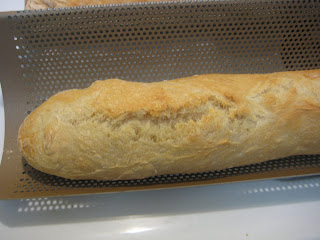
I have gotten out of practice of making my own bread lately. But I had a craving for some baguettes to put some fresh summer tomatoes on, and I decided to make my own. I topped it with tomato bruschetta!
I almost always make my bread according to the Artisan Bread in Five Minutes a Day method, which is very easy.

Baguette (Adopted from recipe by Jeff Hertzberg and Zoe Francois, Artisan Bread in Five Minutes a Day)
Makes enough dough for 4 1-lb loaves/baguettes.


In a counter-top mixer or large bowl, add three cups slightly warm water, 1 1/2 tablespoons yeast, and 1 1/2 tablespoons kosher salt.
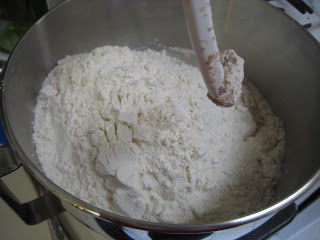
Add 6 1/2 cups all purpose flour. Then use your dough hook attachment to mix all the ingredients. You don't have to let it run long at all, just until all the four is mixed in there.

Dump it in a large container with a lid (It is not supposed to be air tight, and mine is so I only latch two sides of the lid on.)
Let it sit at room temperature for about 2 hours, until it looks like this.

Then put the lid on and stick it in the fridge for several hours, or overnight is best. (Yes, I still have a sticker on there that came with the container. hehe)

Then to make the baguettes I use a baguette pan. It is curved to hold the shape of the bread, and has lots of tiny holes to let the air flow. (It is from Williams Sonoma)

The next day I cut off 2 1lb chunks of bread. Shaped the bread, pulling four corners around to make a ball. Then elongate the ball, placed it on a dusted dish towel in the baguette tray, covered it with the ends of the towel and let it rise for 20 minutes.

Then I sprayed the tray with non stick cooking spray, and turned the oven onto 450 degrees F. Put the bread back in the tray, and put it in the oven with a broiler pan with one cup of water. (The steam from the water helps with a crisp crust.) Let it bake for about 25 minutes, until it was brown and firm to the touch.
I feel French eating this.
The crust wasn't as crisp as I would like, so I am going to work on that for next time. But it was still very good, and very satisfying to make my own bread again!


Stumble Upon Toolbar

Monday, April 27, 2009

Hamburgers: Part 1 The Rolls


It is seriously warm here in PA, it feels like summer right now!! To celebrate, we have been cooking on our new charcoal Weber grill.
So tomorrow we will be grilling hamburgers!
I like burgers but one thing I don't like is figuring out what to put them on. The rolls in the grocery store are full of high-fructose corn syrup, preservatives, and other weird things. The bakeries near us that make their bread from scratch don't usually have hamburger rolls. So for the first time, I decided to make my own rolls!
I found a great recipe over at Coconut and Lime. Today she posted this recipe for Onion-Studded Hamburger Rolls.
I am not going to re-post her recipe, but if you click on the link above you can see step-by-step instructions. And they are not difficult to make, especially if you have a stand mixer with a dough hook. Here are some shots of my rolls being made.

The first step, heating up some milk, water, butter, salt and sugar.
The cooked shallots to go in the rolls. (I used shallots instead of onion)

Kneading the dough in my stand mixer.

The dough after it has risen the first time.
The finished rolls!
I haven't made bread the traditional way for a while, I have been using Artisan Bread in 5 Minutes a Day method, which doesn't involve punching down the dough or kneading. I think I developed a fear of making bread the normal way. But it wasn't that much work, and I had today off so I had the time to wait for each stage. Thanks to Rachel of Coconut and Lime for the great recipe!
Tomorrow, the hamburgers!


Stumble Upon Toolbar

Saturday, March 21, 2009

Homemade Bagels!

When I bought Artisan Bread in 4 Minutes a Day last year, I was excited to make a lot of thing in the book. But not the bagels. It sounded like too much work, with the boiling and what not.
But recently I have decided to take the challenge to make my own! Any bagels in the grocery store have high fructose corn syrup in them. There is a place here that makes their own bagels from scratch, but it's a good 20 minute drive from our house.
So here we go!
First, make the dough.
Recipe from Artisan Bread in Five Minutes a Day by Jeff Hertzberg and Zoe Francois
The Dough
3 cups lukewarm water
1 1/2 tablespoons granulated yeast (1 1/2 packets)
1 1/2 tablespoons salt
1 1/2 tablespoons sugar
6 1/4 cups bread flour

Mis the yeast, salt, and sugar with the water in your stand mixer bowl. Add the flour to the bowl and mix it with the dough hook attachment until all the flour is incorporated. Put the dough into a lidded container (not airtight). Allow the dough to rest at room temperature for about two hours. Then put the container in the fridge. I left it in overnight.
Making the Bagels
Put a baking stone and an empty broiler tray in the oven. Twenty minutes before baking time, preheat the oven to 400 degrees. Also, get the boiling pot going on the stove. You'll need 8 quarts of water with 1 tsp baking soda and 1/4 cup sugar mixed in with it.


Here is the pretty dough, just taken out of the fridge.

Dust the surface of the refrigerated dough with flour and cut off a 3-oz piece of dough (about the size of a small peach).


Dust the peice with more flour and quickly shape it into a ball by stretching the surface of the dough around to the bottom on all four sides, rotating the ball a quarter turn as you go.


Here is the piece of dough formed into a ball.

Push your thumb into the middle of the dough and pull it apart until the hole is three times wider than the width of the bagel. I had a little trouble getting my bagel holes to remain open wide enough, my dough was very elastic.
As you can see they are not perfect looking, but that is ok.
Drop the bagels in the boiling pot one or two at a time, don't overcrowd.

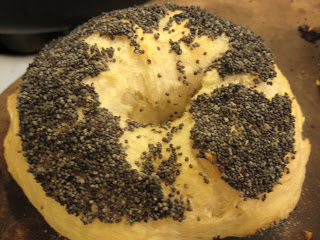
After the bagel boils simmers for 2 minutes, flip it over to the over side and cook it for another minute. Then, dip the bagel in your favorite topping. I did three types of bagels, poppy, cheddar cheese and...


Everything bagels, my favorite! I don't know if these actually have everything, but they have poppy seeds, sesame seeds and dried onion flakes. You could also put garlic and salt on, but I opted to leave those out. Another thing you have control of when you bake your own bagels!
Put the bagels in your preheated oven, on the stone. Put one cup of tap water in the broiler pan below and close the door. The steam from the water helps form a crisp outer crust.

Bake for about 20 minutes, until they start getting golden brown.
Here are the finished bagels.
The cheese bagel.
The poppy bagel.
And the beautiful everything bagel!
We made ham and cheese sandwiches with our fresh bagels.


Stumble Upon Toolbar

Monday, March 2, 2009

Beer Bread!


I need to get my act together and make the meringues chantilly for barefoot bloggers. I will do that this week, hopefully tomorrow.
But for now, I'd like to share a recipe I found at allrecipes.com. I use that website a lot, I like it because of all the reviews from people who have already cooked the recipes. It usually gives you a good tip.
I made this beer bread for a large group of people who came over for dinner, and it received raves. I like to make it because you can make it with things you have around the kitchen already (if you have a bottle of beer), and it is faster than yeast bread.
I made this to go with some mexican-style chile, I think it goes well with soups also.
Whole Wheat Beer Bread

First, grease a bread pan. (I spray with canola oil.)
Get your two kinds of flour.

100% whole wheat flour, and all purpose. Measure 1 and 1/2 cups of each and put in a mixing bowl.
Then add 4 and 1/2 tsp. baking powder, 1 and 1/2 tsp. salt, and 1/3 cup packed brown sugar. Now, what you see in my bowl is 1/3 cup raw cane sugar, and a little molassses since I didn't have brown sugar. If you run out of brown sugar, you can use regular sugar with some molasses! Now grab your bottle of beer.
This is what I used. If you live near Harrisburg, PA or somewhere near it I recommend you get some beer from the Appalachian Brewing Company. Not just for this recipe, just to try! I'm not a big beer drinker, but I really like their beer. And this one is organic! But most beer will work. Just use a beer that you would drink. Don't use Coors Light or something like that. Get a real beer with some flavor! The type of beer you use will change the flavor some.
Now dump the beer in the bowll with the other ingredients. It will foam up a lot, like this. That is fine. Just mix until it is all incorporated, it will be thick and lumpy.
Put the batter in the bread pan, and here is where allrecipes.com is great. The butter on top is not in the recipe, but if you browse the comments most people recommend putting some on top. And they are right, the butter makes it even better.
The recipe says to bake in a 350 oven for 50-60 minutes, but mine was definitely done in more like 30 minutes! So just check on it, it is done when a toothpick inserted in the middle comes out clean.
Eat, with butter or plain.


Stumble Upon Toolbar